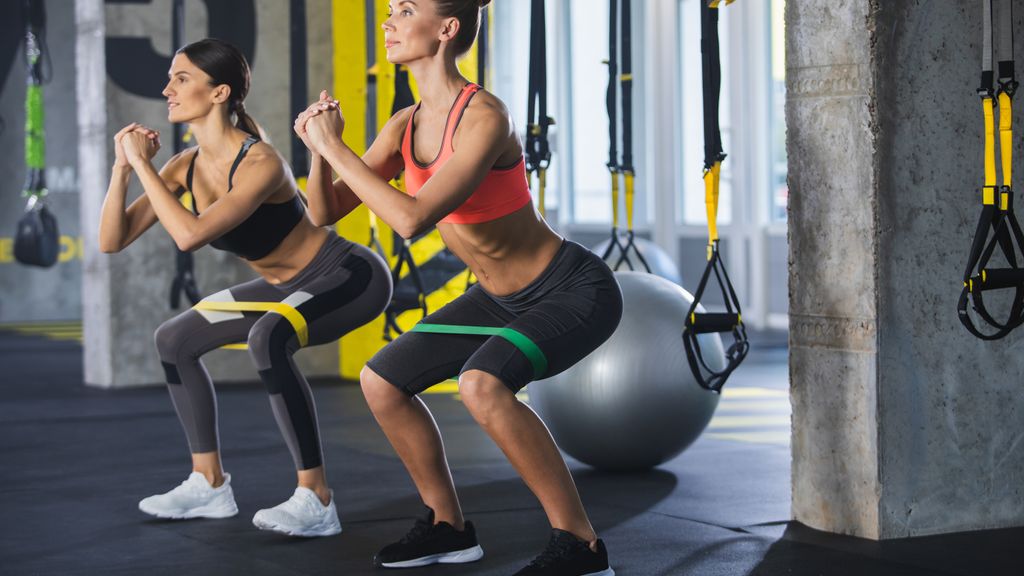
Also called stretchy bands, loop bands, and exercise tubes with handles, this versatile fitness tool challenges your muscles and helps you build strength without requiring weights or expensive equipment. Plus, they're affordable, so you can stay in shape without breaking the bank.
Keep reading to learn the ins and outs of resistance band strength training, including the benefits, different types of bands, expert tips for maximizing the effectiveness of resistance band strength training, and a few sample workouts you can try at home or the gym.
What Is Resistance Band Strength Training?
Resistance band strength training enables you to build muscular strength and endurance without needing heavy weights or complex gym equipment. By using a variety of lengths, styles, and tension, you can do a full-body workout only using bands or incorporate the bands into an existing routine, swapping out a few of your traditional strength moves with resistance band exercises.
How resistance bands work is quite simple. When you train with elastic or stretchy bands, you’ll feel resistance throughout a full range of motion, not just certain parts of the move—one of the many reasons this method differs from free weights and strength machines.
The resistance you feel comes from the tension in the band, which is color-specific (more on that later) and ranges from light to heavy. For example, when you’re doing a banded bicep curl, the band provides resistance by opposing the force applied by your muscles.
As you stretch the band, it creates tension, and your muscles must work harder to overcome this tension, resulting in a contraction.
You can adjust the resistance by changing the length or amount of tension by choosing a different colored band. Plus, you can swap out different bands to match your fitness goals, allowing you to train for muscular strength or endurance.
Get our fitness newsletter
Stay on track with your fitness goals and get inspired! Sign up for the GymBird newsletter for twice-monthly expert fitness and nutrition tips.
Benefits of Resistance Band Strength Training
Resistance band strength training is an excellent way to improve your overall fitness, with or without a gym membership. Not only are bands portable, versatile, and effective, they’re also affordable.
Plus, they allow you to target specific muscle groups while also providing a low-impact workout that is easy on your joints.

GymBird Beginner Fitness Program
Best for beginner at-home routine
Access our 6 week at-home program, gain a strong fitness foundation, and start feeling your best all for less than the cost of a single month at a gym! Developed and demonstrated by certified personal trainer with over ten years of experience.
Instant access to 6-week workout plan
Demonstration videos for proper form
At-home workouts - minimal equipment needed
Increased Muscle Strength and Tone
If you're hesitant about replacing free weights and gym machines with resistance bands for your strength regimen, consider this; research from a 2019 meta-analysis found training with resistance bands provides similar strength gains to resistance training with conventional equipment like weight machines and dumbbells.
Portia Page, NCPT, Education Curriculum Coordinator for Balanced Body, says resistance bands recruit not only the moving limb or body part, but also the stabilizer muscles or body parts, which strengthens the larger muscles when moving and helps to reduce the risk of injury.
Suitable for All Fitness Levels
Regardless of your fitness level, you can find a resistance band that caters to your strength training needs, from beginners to advanced users, explains certified personal trainer, Michael Hamlin, NSCA, CSCS, and founder of Everflex Fitness. “I will often have many of the kids that I train start with resistance bands since they find it fun and they are relatively easy to use,” he adds.
Progressive Resistance
Resistance bands provide variable resistance, which means that the resistance increases as you stretch the band further.
This allows you to start with a lower resistance level and progressively increase it as you become stronger, making it suitable for both beginners and advanced athletes.
Plus, because bands come in different levels of resistance, founder of Everflex Fitness Michael Hamlin says you can progressively increase the challenge as you get stronger. “I like the thin bands for rehabilitation and the thicker ones are surprisingly good at allowing people to build strength,” he adds.
Portable and Versatile
Personal trainer Michael Hamlin says resistance bands are lightweight and compact, making them easy to carry and use anywhere, including at home, the gym, or while traveling. “I really love taking resistance bands outside to do nature workouts,” he adds. They also allow for a wide range of exercises targeting various muscle groups, including upper body, lower body, and core muscles.
Joint-Friendly and Low Impact
Resistance bands provide a lower impact workout compared to weights, reducing the risk of injury, explains Michael Hamlin.
Because the resistance is lighter at the beginning of the range of motion (before the band gets really tight), he says it can allow you to work through each range of motion with less strain.
Choosing the Right Resistance Band for Strength Training
Choosing the right resistance band for strength training can be a bit daunting, especially when you consider all the different colors and styles. While it might be tempting to base your decision on your favorite shade of red or blue, matching the tension level and band type to your fitness level and goals is a top priority when starting with resistance band training.
Understanding Resistance Band Levels and Colors
While each company or manufacturer may have different color-coding designations, Ellen Thompson, CPT, NASM, Blink Fitness, says the following colors and resistance levels are the most common:
- Light resistance = yellow or green bands. These are the easiest to stretch and offer the least amount of resistance. Light resistance bands are ideal for beginners or individuals recovering from injury. They are also good for smaller muscle groups like the arms.
- Medium resistance = red or blue. These provide a moderate level of resistance and are ideal for people with some fitness experience or those looking to increase the intensity of their workout.
- Heavy resistance = black or purple. These offer a significant amount of tension and are commonly used to build strength and muscle. They also work well for compound movements like squats and larger muscle groups like legs, glutes, back, and chest.
- Extra heavy resistance = silver or gray. These are only used by athletes or those looking for an intense challenge.
Different Types of Resistance Bands
Deciding on the right color is not the only consideration when choosing the right resistance band. You also need to factor in the material, length, and style.
Resistance bands are made from different materials like latex, rubber, or fabric. Trainer Michael Hamlin says latex bands are stretchier and offer consistent resistance, while fabric bands are more durable and less likely to roll up or snap.
“You can even find some brands that have latex in the middle and a fabric on the outside to prevent snapping but still provide consistent resistance levels,” adds Michael Hamlin, founder of Everflex Fitness.
Bands also come in various lengths and thicknesses. Michael Hamlin says longer bands provide more versatility for different exercises, while thicker bands offer more resistance.
Another factor to consider is the type of band. “Some bands come with handles or loops, which can make gripping and using the bands more comfortable for certain exercises,” Michael Hamlin.
Here are some of the more common resistance band styles:
- Flat or traditional bands: Also called Therabands, these bands do not have handles or loops and are common in physical therapy settings.
- Loop bands: Circular bands that form a closed loop. Michael Hamlin likes the loops for stronger, harder exercises as you will need something that is comfortable for your hands. If you have a heavy band and no handle it can dig in and tear at your palms.
- Tube bands with handles: Flexible tubes with handles for both upper and lower body exercises.
- Figure-8 bands: Shaped like the number 8, these bands have two handles on either side and are ideal for exercises requiring both upper and lower body movements.
- Mini bands: Small loop bands designed for isolated movements with smaller muscle groups like the arms and shoulders.
- Continuous loop band: Long, continuous loops that work great for upper and lower body exercises.
Basic Resistance Band Exercises for Strength Training
Squats with Resistance Bands
Do 3-4 sets of 10-15 reps
- Stand in the middle of the resistance band with your feet shoulder-width apart, toes slightly turned out. Hold one end of the band in each hand, allowing it to hang down by your sides. Keep your chest up and your shoulders back to maintain good posture.
- Push your hips back as if you are sitting in a chair. Keep your weight on your heels. Bend your knees and lower yourself until your thighs are parallel to the ground or as far as your flexibility allows. Your knees should not extend beyond your toes.
- Keep your back straight and your chest up throughout the movement.
- As you return to the standing position, actively engage the resistance band by pushing your knees outward against it. This will work your hip abductors (outer thigh muscles) and add extra resistance to the squat.
- Squeeze your glutes at the top of the movement to fully engage your hip muscles. Repeat.
Chest Presses with Resistance Bands
Do: 3-4 sets of 10-15 reps
- Anchor the resistance band securely at chest height. You can attach the band to a doorknob, a sturdy piece of furniture, or a wall anchor. Stand with your back to the anchor point, feet shoulder-width apart and hold one end of the resistance band in each hand, gripping the handles firmly.
- Take a step forward to create tension in the band. The band should be behind your arms, and your hands should be at chest level with your elbows bent at a 90-degree angle.
- Exhale as you push the handles forward, extending your arms in front of you.
- Fully extend your arms without locking your elbows and squeeze your chest muscles at the end of the movement to maximize the contraction.
- Bring your hands back to the starting position, allowing your elbows to bend. Repeat.
Bicep Curls with Resistance Bands
Do: 3-4 sets of 10-15 reps
- Begin by standing in the middle of the resistance band with your feet shoulder-width apart, chest up and shoulders back to maintain good posture.
- Hold one end of the resistance band in each hand, allowing your arms to hang down by your sides, palms facing forward, and the band should be taut with your arms fully extended.
- Bend your elbows while keeping them close to your sides, palms should be facing upward throughout the movement.
- Continue to curl your hands upward toward your shoulders while maintaining tension in the resistance band.Squeeze your biceps at the top of the movement.
- Slowly lower your hands back to the starting position, fully extending your arms. Repeat.
Tricep Extensions with Resistance Bands
Do: 3-4 sets of 10-15 reps
- Anchor the resistance band at chest height or slightly higher. You can attach the band to a door handle, a sturdy piece of furniture, or a wall anchor.
- Stand facing away from the anchor point, feet shoulder-width apart. Hold one end of the resistance band in each hand, gripping the handles firmly and take a step forward to create tension in the band. The band should be behind you, elbows bent at 90-degrees, and your hands should be close to your chest.
- Extend your arms straight back behind you, keeping your upper arms close to your ears. Squeeze your triceps at the end of the movement.
- Bend your elbows to bring your hands back to the starting position, close to your chest. Repeat.
Advanced Resistance Band Exercises for Strength Training
Resistance Band Deadlifts
Do: 3-4 sets of 8-12 reps
- Begin by standing in the middle of a looped resistance band with your feet hip to shoulder-width apart, toes pointing forward, holding one end of the resistance band in each hand.
- Hinge at the hips by bending your knees and driving your hips back. Do not go lower than your knees and keep your chest up.
- Squeeze your glutes, driving them forward to return to the standing position. Pause and repeat.
Resistance Band Pull-Ups
Do: 3 of 8-12 reps
- Create a hanging loop with the resistance band around a pull up bar.
- Place your knees or feet in the band.
- Use an overhand grip slightly wider than shoulder width and raise your body as high as you can go.
- Lower back to the starting position. Repeat.
Resistance Band Push-Ups
Do: 3 sets of 10 to 12 reps
- Wrap a resistance band across your upper back, not your neck, and put your hands in each of the handles.
- Get in a push-up position with your hands below your shoulders and a little wider than shoulder-width, arms extended. This is the starting position.
- Lower yourself to the floor until your upper arms are parallel with the floor. Pause.
- Push yourself back to the starting position. Repeat.
Resistance Band Lunges
Do: 2-3 sets of 10-12 reps on each leg
- Stand in the middle of the resistance band with your feet hip to shoulder-width apart and grab each handle with an overhand grip.
- Step your left foot back into a standing lunge position.
- Bring your hands to the side of your shoulders, palms facing out and band behind your arms.
- Lower your body straight down until your left knee almost touches the ground. Pause.
- Push yourself back to the starting position and repeat. Do one set on the left leg before changing to the right leg.
Resistance Band Workouts for Different Muscle Groups
Once you’ve tried a few of the upper and lower body exercises, you can begin incorporating more detailed workouts into your fitness program. Here are three routines to try, including some tips on how to use resistance bands with your warm-up and stretching exercises.
Full Body Resistance Band Workout
This full-body exercise band workout from the American Council on Exercise takes less than 20 minutes to perform and all you need is a few bands and a chair or other sturdy object. There are 12 exercises in this routine and you’ll do 12 to 20 reps of each move before resting and repeating the circuit, if time permits.
Exercises include:
- Leg abduction
- Hamstring curl
- Leg adduction
- Squat
- Lateral raise
- Chest press
- Upper back
- Triceps extension
- Lat pulldown
- Biceps curl
- Back extension
- Reverse crunch
Upper Body Resistance Band Workout
This upper body resistance band workout from Montana State University includes five exercises targeting your back, chest, arms, and shoulders. You’ll complete two sets of 12 reps for each exercise and the entire workout should take less than 20 minutes.
Exercises include:
- Band pull
- Bent-over row
- Upright row
- Single arm triceps extension
- Bicep curl
Lower Body Resistance Band Workout
This lower body resistance band workout from Montana State University includes four exercises targeting your legs, glutes, and hips. It also incorporates a few core stabilizer moves to target the abdominal muscles. You’ll complete two sets of 12 reps for each exercise and the entire workout should take less than 20 minutes.
Exercises include:
- Squat
- Lateral lunge
- Lateral walk
- Hip thruster
- Glute bridge (also uses core stabilizer muscles)
- Hands and knees glute kickback (also uses core stabilizer muscles)
Warm-Up and Stretching with Resistance Bands
Incorporating resistance bands into your dynamic warm-up and stretching routine can help improve your range of motion, enhance flexibility, prepare your muscles for intense exercise, and reduce the risk of injury during your workout.
Some exercises to try with resistance bands include leg swings, arm circles, resistance band walks, arm pull-aparts, standing torso twists, hip flexor stretch, hamstring stretch, quad stretch, calf stretch, shoulder and tricep stretch, and chest opener.
Expert Tips for Maximizing the Effectiveness of Resistance Band Strength Training
Use the Right Resistance Level
Selecting a band that matches your fitness level is key to maximizing the effectiveness of your training. “It’s better to start with a lower resistance band and gradually increase to higher levels or thicker bands as you get stronger (progressive overload),” says certified personal trainer Ellen Thompson.
Warm-Up and Use Proper Form
Personal trainer and founder of Everflex Fitness Michael Hamlin says to always warm up before starting your resistance band workout to prevent injury and improve flexibility. “Simply start with some light bodyweight exercises to get blood flow to the area that you are about to train,” he says.
Maintaining proper form throughout exercises to target the intended muscle groups and reduce the risk of injury is another critical tip, according to Hamlin. “Think of slow controlled movements as this will help you maintain form better,” he adds. Proper form also includes performing exercises through a full range of motion to maximize muscle engagement. “If you don't go through a full range of motion you risk increasing your odds of an injury over time,” says Michael Hamlin.
Keep It Interesting
It’s easy to get stuck doing the same exercises over and over again, so incorporate a variety of exercises to work different muscle groups and prevent plateauing. “Make sure you switch up your exercises every three weeks to a month to prevent this from happening,” says personal trainer Michael Hamlin.
Rest and Recovery
Ensure you allow adequate time for muscle recovery between workouts, as resistance band training can still lead to muscle fatigue and soreness, says trainer Michael Hamlin. He recommends at least a day off for each muscle group you train, and sometimes you might even need two days.
Control the Band Tension
Certified personal trainer Ellen Thompson says to always maintain the tension throughout the rep in a slow and controlled manner. “Don’t let the band snap back as this can lead to injury,” she adds.
Resist the Resistance
In addition to causing injury, allowing the band to snap back into the starting position may reduce some of the benefits. “Controlling the move maximizes the eccentric (muscles lengthening as contracting) portion of the contraction as well as the concentric (muscle shortening as contracting) portion,” says Portia Page, NCPT.
Make It Multi-Use
Portia Page, NCPT, recommends using the band as a way to stabilize a limb. For example place the band under one foot and then lift the other foot while performing a bicep curl or side raise. “This way you maximize the band by using it as a stabilizer and a mover (strengthening the moving limb),” she adds.
Safety Precautions With Resistance Band Training
While resistance band training is generally considered a safe form of exercise, some general precautions should be considered before getting started.
Checking for Wear and Tear in Resistance Bands
Certified personal trainer Michael Hamlin says to inspect your resistance bands regularly for any signs of wear or damage, and replace them as needed to avoid injury. “I've seen resistance bands snap before and it isn't pretty,” he adds. Also, if your resistance band has handles or attachments, regularly inspect them for wear and tear and make sure they are securely attached to the band.
Using Proper Anchoring Points and Secure Bands Safely
Anchor points allow you to safely secure the exercise band to a stable surface or object. Depending on where you’re training, this may include a door, furniture, wall anchor, squat cage, or simply stepping on the band to secure it in place.
Avoiding Overstretching and Maintaining Control Throughout Exercises
Always leave some slack in the band at the start of each exercise and avoid overstretching the resistance band beyond its safe limit. Overstretching may cause the band to snap and result in an injury. It’s also a good idea to maintain control throughout the exercise and move through the full range of motion.
Bottom Line
Incorporating resistance bands into your strength training routine is a safe, affordable, portable way to challenge your muscles and beat boredom.
Choose the color of your resistance band according to the level of resistance you want. You can try one of the routines listed in this article or mix and match exercises from the upper body and lower body section to design a comprehensive full-body workout.
If you’re new to exercise or have any health concerns or injuries, talk with your doctor or another healthcare professional before trying resistance band strength training.
If you’re unsure about how to perform the moves or need some extra motivation, consider working with a certified personal trainer. They can help ensure that you’re performing the exercises correctly and safely and design a program to fit your needs.
FAQs About Resistance Bands
Can resistance bands be used for full-body workouts?
Resistance bands are an excellent tool to use for full-body workouts, especially if you don’t have access to other equipment. Not only are they portable, easy to store, and versatile, but they are also affordable and appropriate for most fitness levels. Plus, you can perform at least one to two exercises for all major muscle groups using resistance bands, making this training type an effective way to stay in shape.
How often should I incorporate resistance band training into my fitness routine?
How often you incorporate resistance band training into your overall routine depends on the number of days you currently exercise and your fitness goals. If you train with strength machines or free weights, consider swapping a few resistance band exercises for your regular moves.
For example, instead of dumbbell biceps curls, do resistance band curls. You can do this for two to three exercises each routine and still use weight equipment at the gym or home. You can also replace a traditional workout with one or two full-body resistance band routines, which is a great way to fit a workout in at home or on the go!
How do I progress and increase the intensity of resistance band strength training over time?
By applying progressive overload to your resistance band training, you can increase the training intensity safely and effectively over time. Progressive overload involves gradually increasing the demands placed on your muscles over time to encourage growth and adaptation.
For example, you can use progressive overload with the colors/tension of the bands by starting with a light band or lighter tension and moving to the heavier tension as your body adapts and gets stronger. You can also vary the sets and reps by increasing the number of reps per set or adding an additional set to certain exercises.
More Strength Training Advice from GymBird Experts
- Ultimate Guide to Strength Training
- Ultimate Kettlebell Strength Training Guide
- Optimal Strength Training Frequency
- Functional Strength Training Benefits
- Best Strength Training Exercises
- Understanding Reps in Strength Training
- Ultimate Guide to Olympic Weight Lifting
- Building the Ultimate Powerlifting Home Gym
- How to Start Powerlifting
- Bodybuilding Guide